1. themes\ocean\layout\_partial中创建copyright.ejs,并输入以下代码:
1
2
3
4
5
6
7
8
9
10
11
12
13
14
15
16
17
18
19
20
21
22
23
24
25
26
27
28
29
30
31
32
33
34
35
36
37
38
39
40
41
| <!-- 《添加版权声明 -->
<!--添加版权声明https:
<%
var sUrl = url.replace(/index\.html$/, '');
sUrl = /^(http:|https:)\/\//.test(sUrl) ? sUrl : 'https:' + sUrl;
%>
<!-- #版权基础设定:0-关闭声明; 1-文章对应的md文件里有declare: true属性,才有版权声明; 2-所有文章均有版权声明 且如果文章对应的md文件里有declare: false 则取消此篇文章的版权声明 -->
<% if ((theme.declare.declare_type === 2 || (theme.declare.declare_type === 1 && copyrighty)) && !index){ %>
<div class="declare">
<strong class="author">本文作者:</strong>
<% if(config.author != undefined){ %>
<%= config.author%>
<% }else{%>
<font color="red">请在博客根目录“_config.yml”中填入正确的“author”</font>
<%}%>
<br>
<!-- <strong class="create-time">发布时间:</strong>
<%- date(post.date, 'YYYY-MM-DD') %>
<br> -->
<!-- <strong class="update-time">最后更新:</strong>
<%- date(post.updated, 'YYYY-MM-DD') %>
<br> -->
<!-- <strong class="article-titles">本文标题:</strong>
<a href="<%= config.url %>/<%= post.path %>" title="<%= post.title %>" target="_blank"><%= post.title %></a>
<br> -->
<strong class="article-url">本文链接:</strong>
<a href="<%= config.url %>/<%= post.path %>" title="<%= post.title %>" target="_blank"><%= config.url %>/<%= post.path %></a>
<br>
<strong class="copyright">版权声明:</strong>
本作品采用
<a rel="license" href="<%= theme.declare.licensee_url%>" title="<%= theme.declare.licensee_alias %>"><%= theme.declare.licensee_name%></a>
许可协议进行许可。转载请注明出处!
<% if(theme.declare.licensee_img != undefined){ %>
<br>
<% } %>
</div>
<% } else {%>
<div class="declare" hidden="hidden"></div>
<% } %>
<!-- 添加版权声明》 -->
|
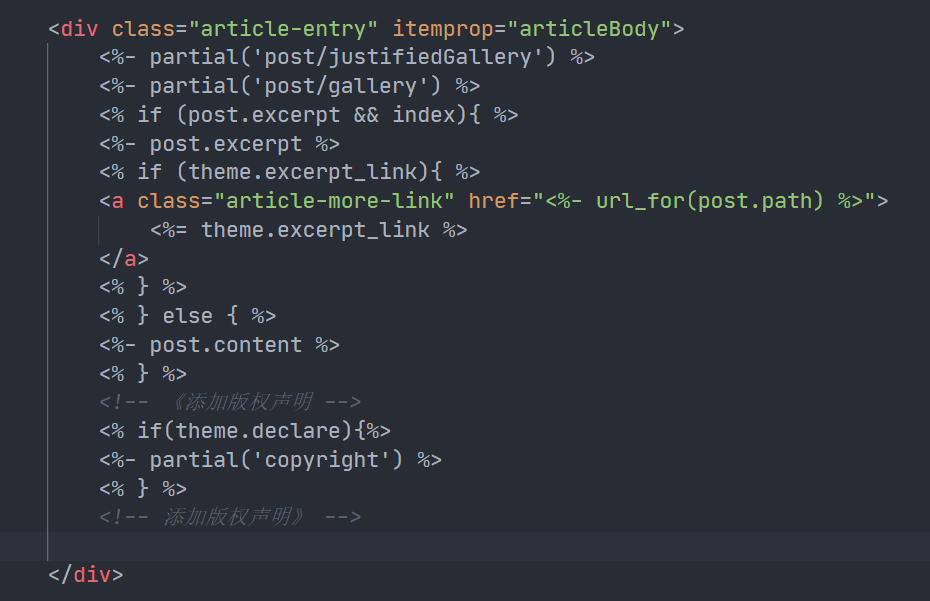
2. 在themes\ocean\layout\_partial\article.ejs中添加以下代码
1
2
3
4
5
| <!-- 《添加版权声明 -->
<% if(theme.declare){%>
<%- partial('copyright') %>
<% } %>
<!-- 添加版权声明》 -->
|
- 具体位置是在
article-inner的div中的article-entry的div块中,例如我的位置是
3. 在themes\ocean\source\css\style.styl中添加:
1
2
3
4
5
| .declare
background-color #eaeaea
margin-top 5em
border-left 3px solid #ff1700
padding .5em 1em;
|
4. 在主题配置文件themes\ocean\_config.yml中添加:
1
2
3
4
5
6
7
8
9
| # 版权声明
#在需要进行版权声明的文章的md文件头部,设置属性declare: true。
#版权基础设定:0-关闭声明; 1-文章对应的md文件里有declare: true属性,才有版权声明; 2-所有文章均有版权声明
declare:
declare_type: 2
licensee_url: https://creativecommons.org/licenses/by-nc-sa/4.0/ #当前应用的版权协议地址。
licensee_name: 'CC BY-NC-SA 4.0' #版权协议的名称
licensee_alias: '知识共享署名-非商业性使用-相同方式共享 4.0 国际许可协议' # alias别名
licensee_img: https://i.creativecommons.org/l/by-nc-sa/4.0/88x31.png #版权协议的Logo
|
作者是直接设置的2,表示在所有的文章中都显示版权信息,当然也可全局设置1,然后在每篇文章中单独设置是否显示版权信息。
hexo clean & hexo g & hexo s
5. 总结:
* 创建一个copyright.ejs用来渲染前端显示的具体内容
* 在article.ejs设定copyright.ejs作用位置
* 在style.styl中设置显示的心态
* 在`_config.yml`设置版权信息所需要的参数
    > 纯前端小白简单理解,期望与各路大佬多多交流
网络上都是以next的配置为主,但next很多是主题作者预先放置好的,所以作者找到了这篇为yilia添加此功能的,做了微小改动。
参考 https://blog.csdn.net/weixin_42429718/article/details/104262871
发布时间: 2020-04-26 20:56:10
更新时间: 2022-04-21 16:33:33
本文链接: https://wyatt.ink/posts/Construct-Blog/63423.html
版权声明: 本博客所有文章除特别声明外,均采用 CC BY-SA 4.0 协议 ,转载请注明出处!
